How To Create a Mech Walker in Blender and Bring It to the Web With A-Frame
Creating the model
Mechs are a recurring trope in computer games. Imphenzia made a great tutorial on how to create one:
I published a video on YouTube showing how to create a minimal model with a full and simple animation cycle:
Let’s now bring this model to the web using  A-Frame.
Exporting the model
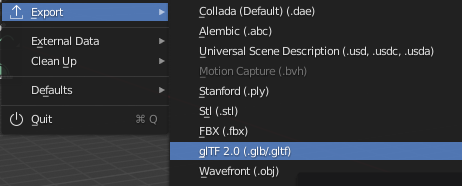
To import the model into A-Frame, it should be exported as glTF, which is a modern format for 3D models. With the model loaded in Blender, choose “File/Export/glTF2.0”:
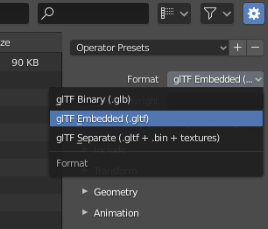
Choose glTF (embedded) there. This will give us one file in JSON Format. All three formats would work, but for production, the binary .glb is preferable.
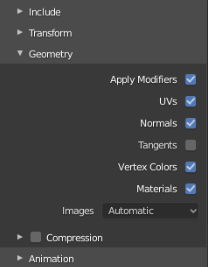
Usually, you also want to apply all modifiers on export:
A-Frame Hello World
 A-Frame is a web framework for building virtual reality
experiences maintained by Diego Marcos. It is a wrapper around the
popular
  Three.js library. A-Frame’s Hello World looks
like this:
<html>
  <head>
    <script src="https://aframe.io/releases/1.5.0/aframe.min.js"></script>
  </head>
  <body>
    <a-scene background="color: #FAFAFA">
      <a-box position="-1 0.5 -3" rotation="0 45 0" color="#4CC3D9" shadow></a-box>
      <a-sphere position="0 1.25 -5" radius="1.25" color="#EF2D5E" shadow></a-sphere>
      <a-cylinder
        position="1 0.75 -3"
        radius="0.5"
        height="1.5"
        color="#FFC65D"
        shadow
      ></a-cylinder>
      <a-plane
        position="0 0 -4"
        rotation="-90 0 0"
        width="4"
        height="4"
        color="#7BC8A4"
        shadow
      ></a-plane>
    </a-scene>
  </body>
</html>
It results into a scene that can be navigated with WASD and is fully WebVR-ready:
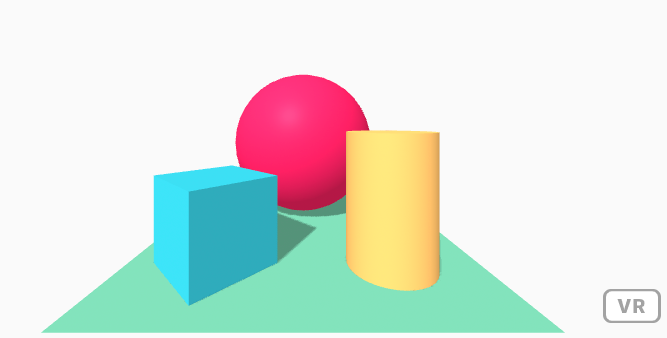
If you create an index.html file, drop this code in there, and open it in a browser, you should see exactly this. For the rest of this article we continue to use this skeleton and add lines either to head or a-scene:
<html>
  <head>
    <script src="https://aframe.io/releases/1.5.0/aframe.min.js"></script>
    <!-- HEAD LINES GO HERE -->
  </head>
  <body>
    <a-scene>
      <!-- SCENE LINES GO HERE -->
    </a-scene>
  </body>
</html>
You will need to use a web server for imports to work correctly. If you have Node.js installed, you can run npx serve or npx http-server in the directory to start a web server.
Importing the model
Importing a model in A-Frame is just one line. It places the mech in the center, so we’ll move it back and rotate it a little. Download the mech.gltf file and replace the content of a-scene with:
<a-entity gltf-model="mech.gltf" position="0 0 -7" rotation="0 40 0"></a-entity>The result should look like this:
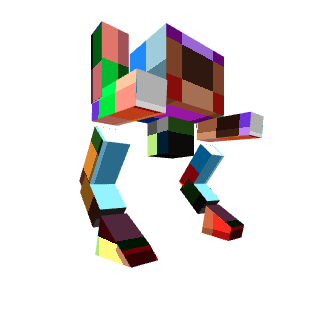
Making it move
Let’s make the mech move by having it walk a circle in A-Frame. This means that we need to:
- Activate the glTF animation from Blender.
- Add a circle movement in A-Frame.
We can use Blender animations by adding the animation-mixer component to the model entity, but since it is not part of the standard A-Frame distribution, we include the A-Frame Extras library written by Don McCurdy into the head of the page:
<script src="https://cdn.jsdelivr.net/gh/donmccurdy/aframe-extras@v7.2.0/dist/aframe-extras.js"></script>Having it walk in a circle requires adding a second entity that offsets the model and defines the animation. After some tweaking, the code in the scene entity looks like this:
<a-entity
  position="0 0 -12"
  animation="property: rotation.y; to: 0; from: 360; dur: 18000; loop: true; autoplay: true; easing: linear;"
>
  <a-entity position="8 0 0">
    <a-entity scale="0.5 0.5 0.5" gltf-model="mech.gltf" animation-mixer> </a-entity>
  </a-entity>
</a-entity>
Environment
A-Frame makes it very easy to add environments. Add the A-Frame Environment Component library by Diego F. Goberna to the head of the page:
<script src="https://unpkg.com/aframe-environment-component@1.3.3/dist/aframe-environment-component.min.js"></script>Then, add the entity:
<a-entity environment="preset: yavapai;"></a-entity>There are tons of parameters that can be tweaked. Read about them in the documentation. Here are some screenshots for default, tron and yavapai (shadows will be added in the next section):
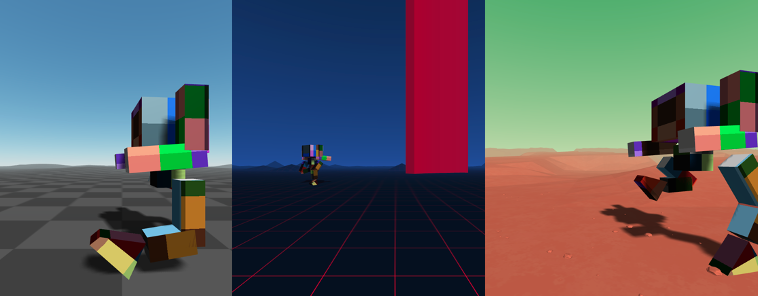
Shadows
The Environment component adds lights already, but since the mech walking circle spans quite some area, we need to introduce a light with a large shadowMap like this:
<a-entity light="type: ambient; intensity:0.3;"></a-entity>
<a-entity
  light="type: directional; intensity: 0.9;
  castShadow: true; shadowCameraFar: 500;
  shadowBias: -0.001;
  shadowMapHeight:2048; shadowMapWidth:2048;
  shadowCameraLeft: -50; shadowCameraRight: 50;
  shadowCameraBottom: -50; shadowCameraTop: 50;"
  position="3 10 10"
>
</a-entity>
Then, we add shadows and prevent double lighting:
<a-entity environment="preset: yavapai; shadow: true; lighting:none;"></a-entity>And add the shadow property to the model:
<a-entity
  shadow="cast: true; receive: true"
  scale="0.5 0.5 0.5"
  gltf-model="mech.gltf"
  animation-mixer
>
</a-entity>
Result
See and remix the final result here: https://mech-walker.glitch.me/
Final code:
<html>
  <head>
    <script src="https://aframe.io/releases/1.5.0/aframe.min.js"></script>
    <script src="https://cdn.jsdelivr.net/gh/donmccurdy/aframe-extras@v7.2.0/dist/aframe-extras.js"></script>
    <script src="https://unpkg.com/aframe-environment-component@1.3.3/dist/aframe-environment-component.min.js"></script>
  </head>
  <body>
    <a-scene background="color: #FAFAFA">
      <a-entity
        position="0 0 -12"
        animation="property: rotation.y; to: 0; from: 360; dur: 18000; loop: true; autoplay: true; easing: linear;"
      >
        <a-entity position="8 0 0">
          <a-entity
            shadow="cast: true; receive: true"
            scale="0.5 0.5 0.5"
            gltf-model="mech.gltf"
            animation-mixer
          >
          </a-entity>
        </a-entity>
      </a-entity>
      <a-entity environment="preset: yavapai; shadow: true; lighting:none;"></a-entity>
      <a-entity light="type: ambient; intensity:0.3;"></a-entity>
      <a-entity
        light="type: directional; intensity: 0.9;
  castShadow: true; shadowCameraFar: 500;
  shadowBias: -0.001;
  shadowMapHeight:2048; shadowMapWidth:2048;
  shadowCameraLeft: -50; shadowCameraRight: 50;
  shadowCameraBottom: -50; shadowCameraTop: 50;"
        position="3 10 10"
      >
      </a-entity>
    </a-scene>
  </body>
</html>